Configure Access to SourceTree to Gitorious Source Control

Overview:

  • SourceTree is a visual client to a git-style source control repository for Windows (in this example) and Mac-OS-X.
  • Gitorious is a wiki/git-style web based file browser and repo setup system like github – except YOU run it.  It is delivered as standalone computer (Virtual Machine) that hosts a git server and wiki all in one. The wiki is integrated into the project. My good buddy at Geek Inc. delivered this all on a 4GB stick which had a VMWare AND a VirtualBox version of it and then he and pointed me in the right direction. Thanks Ben.
  • IMPORTANT – EVERYONE ELSE CAN VIEW PROJECTS PUBLICLY WITHOUT WRITE ACCESS (awesome!) – meaning they don’t have to know git – just send them links to the relevant directories or files AS A WEB LINK – they don’t have control over your files since the files are stored on the Virtual Machine’s internal directory structure. They can make their own accounts – but the admin determines who is on what team for write to the repository. THAT WAS THE GOAL
  • Ideally there Continue reading

How to publish a Paypal button in WordPress and not have it change with a re-publish

Publishing Paypal buttons or other HTML code into your wordpress blog works great the first time, but upon subsequent saves, it can be downright frustrating because the HTML you pasted into the HTML view gets changed. With a simple abstraction using a snippet tool/plugin like HTML Snippet (XYZ Html), the code you intended can stay right in the article each time.

Watch this Youtube Video – it was written for one of my customers. But the basics are:

  1. In Paypal, make a paypal button & copy the button’s HTML code
  2. In you wordpress blog’s HTML Snippet (aka XYZ Html), copy the code and give the snippet a unique name
  3. Paste into your blog or article, the snippet tag/line/code (copy and paste it from the list of snippets)
  4. Publish your blog or article

How to add new functions to the AutoCad menus

Creating a class for the new function using an existing class

  1. Open the class editor, then select the desired path.
  2. Open any of the functions in the same subfolder that you want your function to be in.
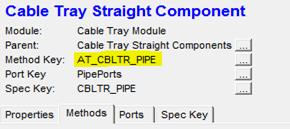
  3. Copy the name of the “Method Key”, then search for the files in your porject directory using notepad ++ or a similar tool, using the file extension .ini. This will locate the folder in your project directory that the class should be placed in.
  4. There are 3 files which you need to place information into to create the class. These are class.ini, methods.ini and speckey.ini (speckey.ini is only needed if your function requires you to get data from a database file).
  5. Create your new class by right clicking on the parent class and selecting “insert new component”.
  6. Enter a name and description. The name is the function that will be called from
    AutoCAD, it should have no spaces and be all upper case letters. The
    description is what will appear in the class editor, this name can include
    spaces and doesn’t need to be uppercase. For example my name is TEST_FUNCTION, and the description is “This is a test function”.
  7. Clicking  Ok will open your new class with default parameters associated with the parent. We need to change the Methods and the Speckey. To modify the methods click on the button ‘…’ to the right of it.
  8. This will open the method’s dialog box, click on the ‘new key’ button on the right side of the dialog box. The name asked for by the new window will follow the same rules as the name in step 6.
  9. Copy the same method key as the existing class you are basing your function off of. The functions called will stay the same as the ones in the method key you copied, they can only be changed from the methods.ini file.
  10. Repeat steps 7-9 for the speckey, the speckey name and the methods name can be the same. Like the methods the speckey can only be edited from its speckey.ini file. When done click the save button in the Class Editor.
  11. Open the class.ini file, new classes appear at the bottom of the file. Once you have found your class you can change the description, the method or speckey it uses and the picture that will be seen in the class editor. If no picture is desired
    then this line can be removed.
  12. Open the methods.ini file, the new methods appear at the bottom of the file. In your method you can change the file location and function name of the sub-method, such as the DRAW_METHOD. Change the desired sub method file location and function so that it looks like %APP_DIR%\file_folder\file_name ; FUNCTION_NAME
  13. Open the speckey.ini file. The DISPLAY_FIELDS indicate which fields from the
    database file are displayed when the function is run, the fields are shown in
    the order they are written, the data will then be sorted alphabetically starting with the left most column. SPECKEY_SCRIPT should be left alone. The SPEC_TABLE indicates which table from your database file information will be used from. The WHERE_CLAUSE filters the data from the selected table, this section works in the same way as an if statement. Only rows that satisfies the clause will be displayed.

Adding a function to AutoCAD Menus, Tool Paletts, Tool Bars and Ribbons

  1. In AutoCAD open Tools->Customize->Interface.
  2. Under the Command List select any command and choose duplicate under the right click menu.
  3. Select the duplicated command (it will have the larger Element ID #), then change the command name to one that describes the function (this will be what appears in
    the menus and tool palettes. It will appear as a description in the ribbons and toolbars).
  4. Change the macro so that it is ^C^C(at_Component_insert “AT_CABLET” “CLASS_NAME”),the first “” is dependant on which folder in the class editor you placed your class in. The second “” must be the name of the class that uses your function.
  5. Select a button image, this is what will appear in the tool palette and ribbon, if
    there is no premade image in the list that fits your function create one using
    the edit button.

    Note : any changes made to the command name, description or picture will not automatically update. The command must be replaced in all menus, tool palettes and ribbons.

Menus

  1. Under the “Customizations in Main File” select at_elect.cuix in the dropdown menu. This will allow changing menu items under “Raceways”.
  2. Open menus->raceways, then either create a new sub menu under raceways or open more sub menus to reach a desired location.
  3. Select your command from the Command List, then click and drag the command to the desired location.

Tool Palettes

  1. Open the desired tool palette, if it doesn’t exist create it using the customize
    palettes (from right clicking on the tool palette), right click the palettes
    box and select new palette. Name the palette to describe the tool set
  2. Now open the customize user interface window
  3. Select your command from the command list and drag it onto the tool palette

Ribbons

  1. Under the “Customizations in Main File” select at_elect.cuix in the dropdown menu.
  2. Open Ribbons->Tabs->Raceways, right click on raceways and select new tab. The tab name is what will appear on the ribbon
  3. Open Ribbons->Panels, right click on panels and select new panel. Name it the same as the tab you just created

Building the Ribbon Panel

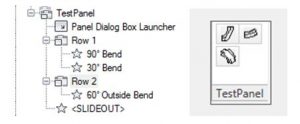
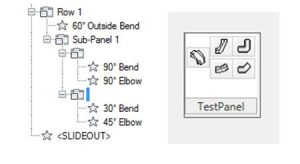
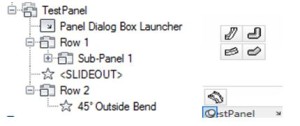
  • Ribbons are based on 3 elements, rows, sub-panels and the ‘slideout’
  • Rows
    • Functions placed in a row will appear left to right evenly spaced, with their order base on their position in the dialog top to bottom

Capture

    • Multiple rows on the same level will make columns

Capture

  • Sub-Panels
    • Sub-panels allow rows to be divided into multiple rows

Capture

  • SlideOut
    • Anything below the slidout will appear only when you place your mouse over the slideout, must be on new row that is beneath the slide out

Capture

  • All functions are added to ribbons by clicking and dragging into place

Tool Bars

  • works using the same principals of the ribbons, except that you can only use a single row and there is no slideout
  • create a new tool bar by opening the customize user inter face, going to at_elect.cuix. Open the Tool bars folder then right click on it and select new tool bar.
  • to place commands on your tool bar click and drag them to the desired location. adding “Flyouts” to the toolbar will create a dropdown similar to the ribbon slideOut when selected. Adding a flyout will also create a separate toolbar that is identical to what is in the flyout

Setting up ASP.NET and SQL Server – frustrating windows security

Sucking Access files into SQL Server… Setup steps:

Now I am getting the error: The database owner SID recorded in the master database differs from the database owner SID recorded in database ‘proSteelMtoPartsList’. You should correct this situation by resetting the owner of database ‘proSteelMtoPartsList’ using the ALTER AUTHORIZATION statement.

It COULD be the user- but look around first on your database properties (right mouse click). I followed these links and REALLY messed things up but with some quicky DROP and CREATE TO scripts, I had another one going in no time. DO NOT do the steps in these links unless they WILL help, but they help with understanding and figuring out current settings. I did NOT restore from a backup – so that is why I should NOT have followed the steps. Never set the owner to sa either unless you have access to that account AND you have taken your account off of the dbo member list.

This person has some GREAT explanations:

What it turned out to be is a couple of things – like the trustworthy – should have been run and to NOT use the statement in the stored procedure – however, this DID fix a problem on another database

  • execute as user=’DOMAIN\my.username’ – which I used for
Annotation in AutoPlant

This is the process I used to find out how the annotation Instrument Balloons function works:

  1. started by opening tools->customize->interface to find the function name for the menu button “Instrument Balloons…”. I found the function “AT_Annot_InstrBubble” was accociated with the menu button.
  2. After searching for the function I found it in C:\ProgramData\Bentley\Plant V8i\elect\at_elect.mnl, which is a LISP file, the function was contained within lines such as “Line 473: (defun c:AT_Annot_InstrBubble_T1   ()  (at_Piping_annotateComponent “InstrumentBubble_T1″)  (princ))”.
  3. By searching for “InstrumentBubble_T1” I was able to find the file annotate.ini under C:\Program Files (x86)\Bentley\Plant V8i\Config\metric\piping (metric is unit system your drawings are set in, can also be imperial or mmetric), this ini file contained the classes for “InstrumentBubble_T1”
  4. the only line that contains a function call is the “textFunction = at_Component_annotateInstrumentBubble”, there are 2 files that contain this function. The first is Annotate.ebs, this has the function definition of at_Component_annotateInstrumentBubble and other annotate functions. The second file is methodes.ini under  C:\Program Files (x86)\Bentley\Plant V8i\Modules\Base. The methods.ini file shows that at_Component_annotateInstrumentBubble is related to the Ann_InstrumentBubble_Method, which is part of the overall base commponents method.
  5. To find which sub methodes are used I went into the respective files and in each function I placed a message box outputing the function name. Running the desired function I determined that 2 functions from this method were called, then other functions I haven’t been able to Identify run afterwords (these functions are not part of the Base_Component_Method). The functions that I can identify create the first dialog box, the functions that run after the dialog box open a second dialog box then draw the annotation.
  6. Base_Component_Method acts as the method key for the parent class of each module such as HVAC or CableT.There are no functions in this method key that contain a draw function or call a draw function.

Git for dummies? Here are some resources to get you started.

Git for dummies. There is no such book, however, here is a quick guide once you know what is going on. Here is another SUPER link and he deserves some sort of peace prize.

Another link is a dummy like resource for newcomers to your team. I have used Git for about a year, but it was only for one or two of us. Now that there is a whole team, we needed a little more knowledge and rather than teach everyone one by one, I thought I would make this post. If you have used SVN, git is a little more intense.

An online book is here. Bare vs. non bare git repository is important to know – check here.

Adding a component with a weld or glue in the MTO (BOM)

search_paths_bentleyIf a piece of rigid PVC conduit is placed in Bentley AutoPLANT, then you will see a red dot or placeholder get added along with it. This comes out in the BOM as a glue. If you place enough of these, it counts the welds. How does this work – can I do the same for kits of stuff like joints or fasteners along with each piece of cable tray.

This is a log of my discoveries on ripping AutoPLANT apart to see how it works so I can create my own components like these so that items can be included as attachments in the MTOs or BOMs created. Continue reading

Installing IIS and ASP.NET – installing things so you can get your website up and running

I have gotten a lot of issues of tinkering with IIS solved before – but never have I written anything down and I have never installed it from scratch. Now, I have to do these steps again so this time I will write them down for myself and others. I will not be using the default website.  I am doing so on Windows 7. Note that this is on the Intranet – so security is NOT my main focus although it is on my mind while setting it up but I am not going to be crazy on that in this discussion – just mention a few thing here or there that you might want to think about. This is where I started from a tutorial standpoint – but I am going back to this once I am done. There is a great MS tutorial in the 1st link in the install section below.

UPDATE: This little step of registering IIS (aspnet_regiis.exe -I) after install has gotten me SOOO many times. ALWAYS do this – see this link.

Install MS Visual Studio Express 2012 for Web

  • download from Microsoft and follow the instructions
  • http://www.asp.net/web-forms – great tutorial site too
  • register it, MS says its free but you have to register – ok – no issues
  • you will require a reboot

Install IIS

Bentley AutoPLANT Environment variables or % variable list

I always said I would do this and I have hit the last straw since I need it often – here is a list of them all. [1 week later] – some of the items are defined in the [ALIAS] section of the AT.INI file in C:\ProgramData\Bentley\Plant V8i\CFG\AT.INI

  • %APP_DIR% is simple the short directory name of the application that you are using.
    • For example, if a file is stored here, the app is the SHORT bolded text
      c:\My Favorite Project\ELECT STUDY\Config\modules\CableT\piping\Draw\myfavorite_drawing_vb_file.ebs
  • %PROJECT_ROOT%
    • – using the same example as above, it is the bolded text
      c:\My Favorite Project\ELECT STUDY\Config\modules\CableT\piping\Draw\myfavorite_drawing_vb_file.ebs
  • %NETWORK_ROOT% –c:\Program Files (x86)\Bentley\Plant V8i\Help\MyFavoriteHelpFile.chm

    but don’t let “network” fool you as it is most likely on your computer

  • %Local_Root% – not sure yet – but here is a samle context: %Local_Root%\modules\AT_CBLTR.mnu
  • %CUSTOM_ROOT%=C:\ProgramData\Bentley\Plant V8i\Bentley Plant V8i Configurations\
  • LOCAL_ROOT=C:\ProgramData\Bentley\Plant V8i

Specification Field Definitions retyped.

When you print the spec fields and their meanings to pdf using the print driver I had, it jumbled many words – Hence I copied it here for my own and your reference – I added a few columns for a colleague s well to add more electrical context than the piping-centric docs would naturally give. The AutoPLANT Component Use column is originally from Bentley (this is my attempt at getting over any copyright concerns – this is NOT my work but Bentley’s)

The spec gen help is OK, but it does not have an ‘overview’ feel. Here is a link to someone who already put together an article with links to good information. Unfortunately, the picture links don’t link his pictures and diagrams.

Note: ** indicate that the field will affect the system ID for the component

# Field Name Specs
asked
for …
What should be asked for AutoPLANT Component Use
Continue reading