Adding a component with a weld or glue in the MTO (BOM)

search_paths_bentley
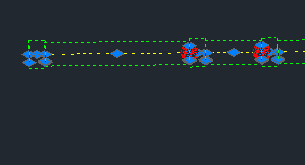
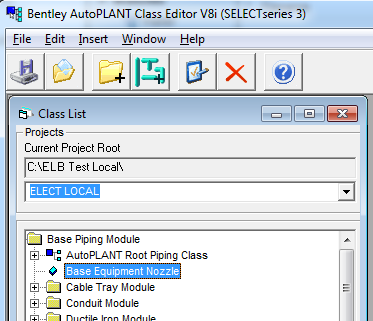
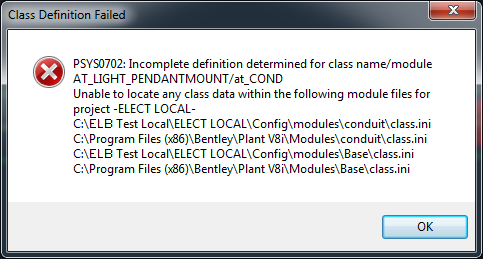
If a piece of rigid PVC conduit is placed in Bentley AutoPLANT, then you will see a red dot or placeholder get added along with it. This comes out in the BOM as a glue. If you place enough of these, it counts the welds. How does this work – can I do the same for kits of stuff like joints or fasteners along with each piece of cable tray.

This is a log of my discoveries on ripping AutoPLANT apart to see how it works so I can create my own components like these so that items can be included as attachments in the MTOs or BOMs created. Continue reading

Bentley AutoPLANT Environment variables or % variable list

I always said I would do this and I have hit the last straw since I need it often – here is a list of them all. [1 week later] – some of the items are defined in the [ALIAS] section of the AT.INI file in C:\ProgramData\Bentley\Plant V8i\CFG\AT.INI

  • %APP_DIR% is simple the short directory name of the application that you are using.
    • For example, if a file is stored here, the app is the SHORT bolded text
      c:\My Favorite Project\ELECT STUDY\Config\modules\CableT\piping\Draw\myfavorite_drawing_vb_file.ebs
  • %PROJECT_ROOT%
    • – using the same example as above, it is the bolded text
      c:\My Favorite Project\ELECT STUDY\Config\modules\CableT\piping\Draw\myfavorite_drawing_vb_file.ebs
  • %NETWORK_ROOT% –c:\Program Files (x86)\Bentley\Plant V8i\Help\MyFavoriteHelpFile.chm

    but don’t let “network” fool you as it is most likely on your computer

  • %Local_Root% – not sure yet – but here is a samle context: %Local_Root%\modules\AT_CBLTR.mnu
  • %CUSTOM_ROOT%=C:\ProgramData\Bentley\Plant V8i\Bentley Plant V8i Configurations\
  • LOCAL_ROOT=C:\ProgramData\Bentley\Plant V8i

Bentley AutoPLANT coding best practices

  • comment lines. There can be too much – but not likely – comment, comment comment
  • use camelCase for variables – classes – use a capital letter to start
    • avoid underscores
    • never use spaces
  • prefix all functions with elb_ or your company name
  • document with pictures
    • use a blog
    • if you store pictures, do so in an easy to transport tool like powerpoint – because everyone has this as a tool
  • all code should be version controlled. If you don’t have one, download SourceTree a github.
  • where possible feed in only human understandable variables -the least possible
    • these variables should be well documented via a blog and this url linked into the code comments at the top.
    • let your computer program do all the hard work with math
    • there will be some hardcoding like the thickness of a peice of metal – however, with “hardcoding”
      • avoid it when possible
      • never hardcode in-line but abstract a niceVariableNameWithCamelCase and then assign the hardcoding to that. Use this variable over and over.
      • put all you hardcoded variables at the top of your routine

Specification Field Definitions retyped.

When you print the spec fields and their meanings to pdf using the print driver I had, it jumbled many words – Hence I copied it here for my own and your reference – I added a few columns for a colleague s well to add more electrical context than the piping-centric docs would naturally give. The AutoPLANT Component Use column is originally from Bentley (this is my attempt at getting over any copyright concerns – this is NOT my work but Bentley’s)

The spec gen help is OK, but it does not have an ‘overview’ feel. Here is a link to someone who already put together an article with links to good information. Unfortunately, the picture links don’t link his pictures and diagrams.

Note: ** indicate that the field will affect the system ID for the component

# Field Name Specs
asked
for …
What should be asked for AutoPLANT Component Use
Continue reading

Making a new electrical component in raceway/electrical package – Start to Finish

This tutorial / step-by-step can be used as a training manual. If you want the log book style article on how to figure all this out see the other article. No lesson in Bentley Docs describes this. There is a help file on linking in the Equipment Modules as a .ebs drawn entity and how to edit those classes. This is for the Piping module side of things for Electrical items – the concepts can be used for any piping module application.

Step 1. Start Class Editor and gather info

  1. Open your Class Editor
  2. Open your project under the menu File->Open Continue reading

Notes on Making a new Class for Bentley AutoPLANT electrical components (Raceway)

class_heirarchyThis is my log on figuring out how to make new Electrical / Raceway (piping module!) components and I hope to help you know the ins and outs. From this, I made another post which is more “do this, do that, etc.” for those that just want to get things done. I needed to write down many notes, so I did so here as it is quicker to type and I can copy/paste stuff back out of this article as I needed the info.

Basically, my spec gen is broken and there is no help available to at the moment so how do I make a new component in the piping module/app? Electrical components seem to piggy back on this module as well. Since I will be referring my handwritten notes as this happens in spurts and I will need to refer to it in 6 months, I thought I would write things down.This will also be used to train on this stuff once I clear the way in our electrical department. So how do we get new specs, new drawing files etc. How is this hole spec, drawing, database thing linked? This too will be answered along the way for you to follow. If you know why my spec gen is broken let me know (here is a link to my exact woes which others have too) Continue reading

Report Services & SQL Server install and set up for use with Bentley AutoPLANT

I am using report services to publish my reports instead of using Crystal Reports for many Bentley AutoPLANT items. Here is my journey over the past couple of weeks:

Install the Tools

If you set up SQL Express with Advanced Services – this is 2008 (download link) – not 2008 R2 (download link). If you are going to back up a Bentley AutoPLANT database – you can NOT restore a 2008 R2 database to a 2008 server, you have to use another method.

  • To make reports, you can use Business Intelligence which comes with SQL 2008 Express with Advanced Services (thanks Geordie Guenther!)
  • A co-worker recommended a really easy tool to make reports that got me 90% of the way (but not advanced) called Microsoft Report Builder 2.0 (there is a 3.0 but we are still in a 2008 SQL Server world). I really like Bus. Intell because it is like Visual Studio and you can do much more.

Get Familiar with things:

Bentley Custom Reports – e.g. BOM for custom electrical equipment

The documentation in Bentley AutoPLANT is in the Program Files (x86)\Bentley\Plant v8i\Help directory and teases us enough to know Bentley is VERY configurable.

This is NOT a discussion of the Datamanager reports – I have not figured out how these fit in.

Here is how to deconstruct what the manuals START to tell us but do not finish

Report (.rpt) files

  • these are crystal report templates. They are NOT version 11 and prompt you to upgrade

How to add reports of your own.

  • the help button under the screen that opens when you access Raceways->Reports->Generate Reports (there are other ways to get there) inidcates that things are quite flexible
  • There are 2 files under the Reports or Config directory that these ‘new reports’ are writing to
    • RptTypes.ini which define your groups and which tables those groups are pulling froml
      • The first pulldown in the Equipment->Reports->Equipment List uses this file (re-open AutoPLANT/AutoCAD to see the changes)
    • Report.ini which lists all the reports and their details and which Crystal Reports template is being used (your .rpt files)
      • you do NOT need to re-open AutoPLANT/CAD to see changes
    • BOTH ARE REQUIRED. Currently on the system we have someone forgot to put the RptTypes.ini file in place so you CANNOT place your custom reports in your own custom folder as the RptTypes file resides on everyone’s local computer. Report.ini can be on the server common to everyone … %Network_Root%\Config directory
    • See below for an example of how they are connected

RptTypes.ini and Reports.ini examples

The RptTypes.ini file are the groups – the groups in the List in the Autoplant tool do NOT use this file – but this file sets up the groups and what tables are used to make the report

[dos]
[ELECDEPT1]
Description  = Electrical Cable Tray Report Type
TableType    = Piping
DBType       = ModelDB
[/dos]

The Reports.ini file lists all the reports, associates to an entry in RptTypes. If you place this at %NETWORK%\Config along with the RptTypes.ini file – it seems to work. However if you look at the lcoations on the local installed diretories on your computer, there are config files in metric,imperial and mmetric as well. On you local computer these files are at: %Program Files%\Bentley\Plant V8i\Reports and %Program Files%\Bentley\Plant V8i\Config\{imperial or mmetric or metric} respectively

[dos]
[Elec Equip BOM2]
TYPE            =ELECTRICAL
SCHEMA          =C:\Program Files (x86)\Bentley\Plant V8i\Reports\EqupListElecB1.rpt
DESCRIPTION     =Custom BOM for Electrical Department1
DRAWINGOUTPUT   =No

[Cable Tray MTO2]
Type             =ELECTRICAL
Schema           = C:\Program Files (x86)\Bentley\Plant V8i\Reports\Cable Tray MTO2.rpt
Description      = View, print or export to a file for a Cable Tray Specific MTO for ELB Electrical
DrawingOutput    = No
User_Methods     = CABLE_LENGTH_METHOD

[/dos]

Bonita BPM opensource from Bonitasoft – what is it?

Bonita Open Source (BOS) is a system to allow an organization that is local or across the globe to work a process from start to it’s finish and know where in the process one is. You can start one or dozens of the same one or different ones. As a friend of mine said – you are really programming people – project management without the overhead of training or making costly mistakes – this system leads them through the whole thing.

If you leave process sitting at your desk for the weekend – it will be waiting there on Monday morning. If the process is stale, it could kick off another process to alert others that there is a hold up. Since I had the pleasure of sharing my first Bonita experience with a good friend of mine, I will redirect you to his site for a more business level discussion of what Bonita OS is. I was the implementer of most of the processes.

Platform independant

It is web based and therefore platform independent and simply connect human processes and be an alert mechanism between people or it can complete complex processes that are already in place. It is programmed using Java and Groovy and can connect ANYTHING it seems together in an automated fashion

Setup of the system and users

It is not the easiest too to get under way but when it comes to getting processes kicked off, getting snibbets of info from person 1, then moving on to person 2 to get more info and keeping track of where a process is in the grand flow, I have never seen anything more complete.

Setting up users, roles, hand-off and moving processes forward in a managed way is quite easy with Bonita Open Source (BOS) from Bonitasoft. They seemed to have thought of it all as real people get stuck, make mistakes, go on holidays etc. and the show must go on. Bonita accounts for all that.

We started with BOS 5.9 and it includes a designer suite and published modules get uploaded to a server version in a VERY controlled manner. There will be no cowboy programming techniques allowed with this system which is EXCELLENT for you customers or end users.

Programming

The basic flow is programmed with standard BPMN notation but with a programming flair. This article by a colleague is clearer than I can tell you so click here. Communicating design with the customer is therefore a breeze since the flow can easily be seen visually.

The documentation is perhaps complete but the whole picture is only complete with the documentation at Bonitasoft, their forums some videos, and lastly trying to get it to work yourself with small experiments. I was fortunate enough to have a friend at geekinc.ca to share the learning curve with and we could share ideas. I would get good at integrating custom extensions while he proceeded to get good at making once process flow talk to another thereby keeping things modular.

Their source code is available and published documentation of all the api’s (classes) available. The answers are there – there is just no examples of how one feature interacts with another. This is better than one company I worked for which had an api as big as this and there was no documentation except walking into the 17 year old veteran’s office and he and I would step through the code and get an explanation of the features. If there was only someone who wrote a book … oh that is the eventual intent of this blog is to cover that gap in the meantime.

Integrate just about anything

At first, you can cobble together a process with just human pseudo tasks that bounce to the correct people. Then one by one, you replace one human task with a sub-process which contains tasks that in of themselves are programming but could also be what is called a connector or plug in. Since the system is based upon Java and Groovy, download Netbeans and start creating classes. Connectors are themselves classes that can calll custom classes. We have integrated a system automatic PDF generation using PDF-tk which is a command like tool by interfacing it with a simple piece of Java code packaged as a jar. Other simple examples is an “Excel” database lookup. A matrix was provided to a Java jar which processed an excel file and gave back a list of strings from that Excel file. Anything can be integrated together since Java is cross platform AND works across machines quite easily. The hard part about Bonita is finding out all it can do since the possibilities seem endless like Sharepoint, Microsoft, MySQL, Oracle, groovy, google and hundreds of other connectors already exist let alone the ones you dream up.

Moving from design to production

The final implementation for end use is on a server installed version of Bonita. Integrating design iterations in must be done in a version controlled way which is slower, but better for the customer’s expectations and the end users experience.

How far does the Open Source take us – what if we want to pay?

This all depends on who is paying for things. The open source has its limitations like inter-webform validations and document uploading into the process. Many things are made easier with a paid subscription and there are 3 levels you can purchase from Bonitasoft. You get a few sample templates to ease Bonitasoft’s very sparse documentation.

Really common groovy and Java code for Bonita

I seem to use this code all the time so I published it for others to use.

Java Date to MySQL

[cc lang=”groovy”]
java.util.Date dt = new java.util.Date();
java.text.SimpleDateFormat sdf = new java.text.SimpleDateFormat(“yyyy-MM-dd HH:mm:ss”);
String currentTime = sdf.format(dt);
[/cc]

date MySQL string to Java:

[cc lang=”groovy”]
import java.text.SimpleDateFormat;
import java.text.DateFormat;
String target = “2012-02-01 20:29:30”;
DateFormat df = new SimpleDateFormat(“yyyy-MM-dd HH:mm:ss”, Locale.ENGLISH);
Date result = df.parse(target);
println result;
[/cc]

Debugging to the Bonita Log

[cc lang=”groovy”]
import org.slf4j.Logger;
import org.slf4j.LoggerFactory;
Logger LOGGER = LoggerFactory.getLogger(this.getClass());
LOGGER.error(“Your String Here”);
[/cc]

Groovy SQL in place of MySQL connector which is more of a hassle than a help

[cc lang=”groovy”]
import groovy.sql.Sql import java.sql.Connection;
import java.sql.DriverManager;
import org.slf4j.Logger;
import org.slf4j.LoggerFactory;
Logger LOGGER = LoggerFactory.getLogger(this.getClass());
sql = providedscripts.BonitaSql.newInstance(“jdbc:mysql://10.11.12.13:3306/grails”,”user”, “password”, new com.mysql.jdbc.Driver())
sql.eachRow(“select * from person”) { LOGGER.error(“Person = ”  + it.first_name + ” ” + it.last_name); }
[/cc]

Groovy web link encoding that works

[cc lang=”groovy”]

def gotoLink = configMap[‘wwwformspath’]+java.net.URLEncoder.encode(pdfFinalPdfWww).replaceAll(“\\+”, ‘%20’);
string=”Click to edit PDF Form“;

[/cc]